
Leaderboard

.thumb.jpg.40fa3417bb8f746949f0efeca5d720c1.jpg)

Popular Content
Showing content with the highest reputation on 07/09/2020 in Posts
-
Hi all I am Norseman, a hobby grower you might call it and a reviewer of gear for Vaping and now also for gear connected to dry herb. The reason for doing reviews on gear directed towards cannabis is because of chronic back pain and the only thing giving me some relief is cannabis. Nice to be here.3 points
-
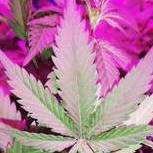
Sales hype, you need these to see the plants glasses and save your eyes, normal sunglasses wont work, you need these...lol. Since when is a spectrum of the sun made by the sun, or by a light source, be it whatever it is, not be the same? Like saying the UVC the sun makes is different to the UVC a bulb makes You not going to wear those yellow tinted glasses, it wouldn't be worth it, but if your plants are green and correct, you can use a sunglass.3 points
-
Just make sure the colour of the sunglasses, doesn't mess with the colour of the plants when looking through them, it makes it hard to diagnose them and you might miss something. That's the only reason they sell certain HPS OR LED glasses, cause they make you see the plant in colour a human can see best in. Plants aren't green, they just reflect green3 points
-
Oh yeah, the sunglasses I use are both also polarised... If it makes a difference, lol. Sent from my POCOPHONE F1 using Tapatalk3 points
-
Lol, yeah man these grow lights are bright AF... I use regular sunglasses (black tint) but I also have these glasses that have this greenish-blue tint on them (they do a better job). Those are just what I use. There are glasses with lenses made specifically to basically even out the spectrum and light intensity on your eyes which cost a bit and are available from grow shops. These are more effective and are made so that you can see the actual colours of the tree and such no matter the colour of the grow light it's viewed under (provided you buy the right one).3 points
-
HPS is still the thing to beat.. they are just very very hungry. g/watt they lose against LED.. if I wouldn't have to worry about electricity cost at all.. I am rather sure, I still would use HPS lamps. They are great but very expensive to run.3 points
-
digikey had free express shipping at the time. Aliexpress goes per weight.. so was cheaper for me to order from 2 different suppliers. If you buy just one QB 288, do NOT take the 240 driver, take a 120.. other way you waste way to much energy or need a dimmer. The 120 works perfect and the draw is correct. The 240 draws way more as it just tries to squeeze everything inside the board.. one reason my boards were way to hot. Now.. not even sure I need a heat sink, hand warm. So select the driver matching your boards wattage. 1 QB288 IM301B/H - HLG 120H-48(A, B or AB) 2 QB288s - HLG 240H-48(A,B or AB) If you do not want to use a dimmer, just don't connect one and it will run 100%, works on all three driver versions A, B and AB. But you still have the option.. I go with B usually as I like to connect them to a Arduino system and dim from that source.3 points
-
i was having a look at this thread from the starting your own grow section - lol - this thread has properly blown up and become one of the most popular and most frequented topics on the whole forum!!! well done mate, you are well on your way to becoming green fingered hooligan like the rest of us!3 points
-
OK cool. The light from master g can be dimmed as well, so I guess I'll just use that as it's already installed in the cabinet.. And then maybe add the supplemental light afterwards. I can still use it to grow macro algae for now in my fish tank refugium lol. Thanks again for all your help and time brother. I really appreciate it. And that goes to everyone who has assisted /n given advice.3 points
-
The author is not taking into account specially formulated soils, which generally has zero michorizzal input from the 'earth'.3 points
-
i found the comments quite informative, not so much the article unfortunately his approach to myco's is not as simple as "you should already have so adding more is futile" i would consider this guys opinion if i was a much more experienced grower and i knew for a fact that my myco system is on point if you are in doubt - it seriously is one of the cheaper additives - just add some in - it will not hurt i know this is in the soil section. but mycos in coco and hydro is very important in my opinion and everyone should have a tub of the stuff laying around3 points
-
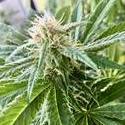
Week 9 Started... and they also start to put on some smell now ^^ Day 1 Week 9 And week 8 in motion. The cam and the fan started to collide. And then the less important had to go ^^ .. the Fan hehehe So sorry for the cam moving but the fan did that. Also nice to watch the plant relax after the wind disturbance is gone.3 points
-
They are below my eye level, thankfully Cause, yes...even the reflection is enough to leave me with a headache some times, and put on my sunglasses, they aren't meant for LEDs but gather if the lights are a specific spectrum of the sun, and I'm wearing quality Polarized sunglasses, I should be 100% Dont kill me if it's not2 points
-
Must say , I think im starting to read the girl a bit better and if not sure normally wait a day longer before i feed and seems like i found a good rhythm.2 points
-
I was going to say, so much Info in this thread, it should become a sticky or go to for new growers haha But @zolrooker knows everything he needs to grow and impress even us here2 points
-
Lol, any way to make the whole thread into pdf and post a link? Sent from my POCOPHONE F1 using Tapatalk2 points
-
My pleasure, also wanted to say, and I'm sure you have already, sealed all light leaks, as you going to go reverse day / night, you'll have the day time light to deal with that night time wouldn't be an issue ( more critical in flower, but I like to keep the habit). That's the last thing I wanted to say. Good luck brother2 points
-
Thanks for all the help guys. Much appreciated.2 points
-
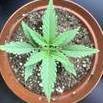
Hey bro. After reading your dairy on the flux mainline method I decided to go with that flow. The decreased veg time when compared to the Nugbuckets method is a definite benefit. 2 specific strains I am running are loving the topping and tie down high stress training. Peyote WiFi by Seedsman and Washing Machine by Ripper seeds. I did the second and final topping today but the two 2 new grow tips on either side still need some growth.... With your experience, how far do I still have to go in veg before flipping? Washing Machine Peyote WiFi As you can see I also went with the Perlite top layer for the soil run off and it works real well, thanx for the tip The clean up for the flux mainline also results in some real nice clone cuttings which turns out to be real benefit when you consider the price of decent genetics. Happy growing2 points
-
CMH with LEP is one day lights for me. Till then I'm on the cheap cheap running costs2 points
-
I agree I've also noticed that afternoon temps are higher than midday honestly, so I've decided to go lights on at 6pm. Sent from my POCOPHONE F1 using Tapatalk2 points
-
I agree, Try to have your light switch on at 5 or 6pm, as it starts to get cooler, your room or area will be okay till that time of day to switch off, just before the external temps effect that space. My 2c Currently I hit maximum temp at between 3.30pm and 5pm. Then gets cooler fast.2 points
-
I do this. Helps keeps temps stable and within a nice range. It works well in my setup. Sent from my POCOPHONE F1 using Tapatalk2 points
-
Correct, good stuff the Mycorrhizae Plus it has insect frass in it2 points
-
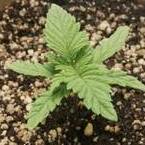
Na.. don't worry.. is not really a hot mix. But a great buffer for all. Main nutes still come from BioBizz, but is a very fluffy mix. With Root Juice, they grow very fast in the first 2 weeks. I always reach 5 finger leaves end week 2.2 points
-
Perfect2 points
-
Hello everybody, I start my seeds directly in the jiffies. Also did the papertowel method in the past. My reason for starting the seed directly in the jiffie without a soak is that I want to protect the fragile taproot. Once the seed is in the jiffie I put it in a warm place and wait till the seedling breaks through the surface. Thats when I carefully place the jiffie into the final pot. That's just how it always worked for me, but there are so many different ways to start the seeds. Sorry my English isn't 100%. I am from Germany originally (hi @Prom )2 points
-
You are over thinking it now, you got this brother. Have faith, and we are here if you come across any issues, with what you have and our already guiding you, you are going to be just fine.2 points
-
I use Freedom Farm Premium.. drop the seed directly in it.. they love the shit2 points
-
do it!!! just a few mm deep, nothing crazy i was topping up the saucer every morning because the it was dry - but never from the top of the jiffy unless the jiffy is obviously dry2 points
-
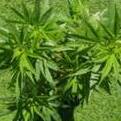
There are many way better growers then me on this site. I ignored Autos for 3 years.. autoflower.. what shit is that!? hehehe But when a professional grower tells you.. "mhhh Cape Town, you should put some Autos outdoor, that should end great with the amount of sun you guys have. First batch has also no seeds." The second part made me listen.. i tried them and cursed myself not to have given those babies a earlier chance to prove them self. I had one more grow of Fems beside the Autos.. then decided that I actually enjoy Autos a lot more.. and we talk miles I am over snipping and binding. I want to grow as relaxed as possible and get some results. The Gelato.. that weed changed all my books. And my tracker moved, post office is catching up.. 100 42FastBuds Gelato Seeds inbound, passed customs already that should keep me happy for a year might sell some of the beans I don't need. No need to let em get old.2 points
-
or if you can, leave your tent open when lights are on?2 points
-
@Prom Im amped bro. Got my autos. Gona maybe germ the banana monkey 2nyt. Making a stop at GTH for the jiffyz quick.2 points
-
As a side note, if you have issues with heat... One thing you can do, and it stabilizes the temps more which is what you want ideally, a stable and less changing temps. Change your grow around, if your lights come on at 6am and off at 6pm, for example, then you rather run the lights at night when its cooler, and off in the day when its hottest, so on at 6pm and off at 6am, flowering example.2 points
-
You slowly convincing me to try auto flowering, as what I've seen has been ridiculously good, and as you say, they just have a certain vigor about them and style and growth. Again, big ups to you on the grow brother Prom.2 points
-
I've completed a grow with a similar light, it flowered really well. Got around 0.83g/w. I think it would make a good supplemental in flower[emoji1362] Sent from my POCOPHONE F1 using Tapatalk2 points
-
two are not drinking as they should. Noticed on one plant very fine yellowing on the tips.. my inner feeling told me to give them a pure water feed today. Royal Queen seeds say is a 8-10 week plant. Also shows you, that you can't trust those numbers, very sure the plants will need 11 weeks. But 8-10.. I select my 8 week feeding sheet that one takes no prisoners. I should be scratching the limits here @afternoon blazer I don't do this to show how great I am as a grower.. I actually am not I have more respect for the guys getting a 600g harvest out of a single fem. I grow for over 30 years.. and all I want to show is that Autos are a new breed to deal with. Those hardened Nordic suckers have a unbelievable nute distribution. They go way more berserk with flowering, as they usually have way less time to do their job in nature. Due to ignoring the Photo sensitivity you get a lot of energy into the plant in a very short time.. and best is just the fact: don't disturb Autos! We did 2 individual tests for defoiling. In both tests we selected the fastest growing and strongest plant and made a clever defoil.. open the light to the buds, not touching the other fan leaves. Both tests had exactly the same outcome.. the once strongest and biggest plant had in both batches at the end the lowest yield. And was never second last or middle.. dead last. Undisturbed, they seem to perform best.. so if you like to grow but don't want all the training snipping, binding, folding or what do I know.. go Autos they yield unbelievable well for the size they form.. just keep them happy feed and have the right climate. Mine is never dropping below 19 and not over 22.. love winter indoor growing2 points
-
Cool, thank you. With regards to the extra supplemental light, it's not really necessary to have it now, or probably even the light of Master G right now at full power. Like Evan said the other day and you can find online, your seedlings really only need a little bit of light 200 to 400 PAR and anything more would be a waste of electricity and potentially burn the seedlings. I'd say use the UFO style light with more red now till they need more light, and then run the new light, probably on a dimmer and working up to full blast in flower and then adding the UFO for supplemental lighting. I bring my lights on in stages in the morning and off in the evening to replicate the sun rise and set, the UFO is perfect for that spectrum too. But this is stuff you play around with after you can grow start to finish a decent plant. Seen as the sun is probably one of the best light sources you get, and still seen people grow air rated weed in the full sun, and therefore those people buying the best light for indoor, but they have a few basic elements missing so it isn't worth the investment yet. In other words, before playing or investing too much, get a few runs under your belt and go from there.2 points
-
2 points
-
I love a side by side, All your brothers and sisters here do We can even advise you best on how and it would start with 2 clones from the same plant. Let us know when you are ready1 point
-
Agreed Sent from my POCOPHONE F1 using Tapatalk1 point
-
Bit hard to see what it is drop the popped seeds directly into the final pot. 10 Liter pot filled with FF Green bag will do the trick. You do not need Root Juice.. I just waste some cash with it. When you once run into it.. get a small 250ml bottle.. lasts for a very long time as you only use it first week, then stop. More important is BioBizz Fish Mix.. that is the steroid version of Seagro Before I would use Seagro I would go Guanoflo, has way more N.. that Seagro bottle wouldn't last to long.1 point
-
What I suggested to him was not to start to seed directly in the ff soil. I think there’s a warning on the bag not to do so hence I never tried it.1 point
-
Can tell you how I do it.. doesn't mean this is the only correct way is just one way. Drop the seed in a glass of hand warm water (i use BioBizz Root Juice already here (4ml/L) Keep it for 12 hours in the glass (dark and warm), avoid leaving it longer then 12 hours swimming.. sounds funny, seeds also drown. If it popped in the glass.. put on a smiley face. Put the seed in the final pot, about 1 cm deep. Keep it warm! (25 degrees sexy) If it doesn't pop in the glass, I like to plate. Use 2 dinner plates and 4 sheets of kitchen paper. Wet 2 papers fully and squeeze the water out by hand. Should be moist, not wet. Put on plate no1 and cut everything hanging over the plate off or fold inside. Have a 1cm gap from paper to outside of the plate. Do same for plate no2. Put your seed(s) on the paper on plate no1.. if you put several, leave a gap (2-3cm) between each and do not handle with your fingers.. find a way in any case wash your hands before you handle your seeds.. best non powdered medical gloves. Then put plate no2 upside down on plate no1.. flying saucer style. Dark and warm spot like the glass. Some prefer to let them grow till root has 2 cm.. I plant em when they pop. They need WARM!!!!! They drop ONCE below 12 and you have issues.. below 10 is bye bye seed! Keep that in mind!1 point
-
due to the length of this post - i went back 2 pages and may have missed your tray and jiffies post or not gone back far enough haha hows about a new one?1 point
-
I dont know @Pat999 But by the way you all been talking about him, I'm starting to miss him too Sounds like he is an awesome cannabro.1 point
-
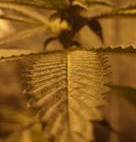
DWC Update | Week 4 Going to try and stick to Monday updates. Things have really started to take off! Super impressed with my 320W Quantum Bar setup! The internodal spacing is extremely good!! Plants are absolutely loving life. I have increased Nutrient Solution from 0,5 EC to 1,2 EC pH 6,3 Nutrients will stay at this strength until i flip to flower. Other than that they will all get "topped" either tmrow or the day after.1 point
-
Interveinal chlorosis is usually an iron, zinc or manganese deficiency if not a heat/air/root issue. I would reduce the amount of grow & flower nutes & up the micro a bit Sent from my SM-N950F using Tapatalk1 point
-
Reminds me of when I needed a veg area ASAP, converted a tv stand taking up space in the garage,,, Sun visors work like a charm!1 point
-
I did a post quite a while back on how to make your own shrimp meal. Here's a simple video guide on how to make your own1 point


This leaderboard is set to Johannesburg/GMT+02:00
